


How To Get The Best Results With One Step Compound
How to Get the Best Results with One-Step
 Skip to content
Germany

The newest addition to our fleet, a 1987 BMW E28 535i, was in serious need of the AF treatment. We arranged a week-long detail, enlisting the expertise of some of our highly trusted members from the Accredited Detailer Network, including Urban Valets, Valet Nova, Artisan Automotive, and The Car Genie.
The first day of this extensive detail began with a thorough pre-wash and contact wash. We removed all the old soundproofing from under the bonnet, which left behind a significant amount of glue residue that needed careful attention. After masking and covering electrical components and air intakes, we dove into the washing stages—proper preparation here is crucial.
Starting with the wheels and engine bay, we removed the wheels entirely to allow for a comprehensive cleaning of the wheels, wheel arches, and engine bay. Using Eradicate engine degreaser along with detailing brushes, we were able to access intricate areas. We applied ObliTARate tar and glue remover and Iron Out fallout remover to eliminate grease and stubborn contamination accumulated over the years. While treating the arches and engine bay, the wheels underwent a dedicated Imperial wheel wash and finished off with Iron Out to dissolve any remaining contaminants.
Next, we focused on the paintwork. The entire car was sprayed with Citrus Power bug and grime remover, which we agitated using one of our quality detailing brushes. Knowing we’d be machine polishing later, any light marring caused by this step would be addressed in the next stage. Avalanche snow foam was then layered over, and we paid extra attention to rubber trim with more Citrus Power and a Hog Hair brush. For the shampoo stage, we used Lather car shampoo, applying it with a mix of lambswool and noodle mitts for a thorough wash.
For decontamination, we applied Iron Out, followed by ObliTARate to remove embedded contaminants. Using a tar remover like ObliTARate as the second decontamination step after Iron Out is essential, as is following up with a wash to neutralise the solvent before claying. The entire vehicle was then clay-barred with Glide lubricant, followed by a second snow foam rinse and a towel dry with our popular Aqua Deluxe drying towel.
We then brought the car into the Detailing Academy, where it was set up in the detailing bay for dismantling. We removed various components, including wiper arms, badges, spoiler, door handles, indicators, rear lights, front lights, and number plates, preparing it for the second day. We assessed the paintwork with depth gauges, marked dents and chips with masking tape for future repair, and masked off windows, trims, plastics, rubber edges, and the pin-striping.
Day two focused entirely on paint correction—covering every inch, even the undersides! We began by testing two of our specialised products, the One Step single-stage polish and the Revitalise three-step compound kit, on small sections to gauge how the paint responded. Since One Step is a non-filling polish, the finish it reveals is the true, unmasked result. It uses abrasives that progressively break down during application, initially cutting through defects like a heavy compound and then refining the surface as a polish.
Working panel by panel, we carefully evaluated each area’s reaction to the products and ensured we used the right polish and technique for each unique spot. This meticulous step is essential, particularly with older cars, where unknown factors like previous repairs, storage conditions, or UV damage on horizontal surfaces can affect the paint’s response. We used depth gauges to measure paint thickness on various sections of each panel before any cutting began, adapting our approach based on these readings.
With One Step or the Revitalise kit, and our machine polisher, we moved systematically around the vehicle. We also used a glossometer to monitor the gloss level panel by panel, verifying the results as we progressed, until every section reached the desired finish. This attention to detail ensures an even, high-quality gloss and depth across the entire car.
With the cutting phase complete, we moved onto the refining stages. Using our three-step Revitalise Kit—Step 1 for restoring and cutting, Step 2 for polishing, and Step 3 for refining—we carefully adjusted our approach based on paint thickness readings to ensure a perfect prep for polishing and protection. Once machine polishing was finished, we applied the first coat of wax, buffing it to a flawless finish. For this project, we opted for wax instead of ceramic coating; since the E28 will mostly stay indoors and be driven only occasionally, it doesn't require the long-term durability of ceramic. Wax also provides a warm glow that complements an older car like this.
Next, we enlisted The Dent Men to repair 34 years’ worth of parking dings that we had previously marked with masking tape. Over in bay two, we turned our attention to the finer details. With the front grille removed, we polished the headlight bezels using Mercury metal polish, sanded down corrosion on the rear light surrounds, masked the lenses, and applied a fresh coat of satin black to the surrounds. The front indicator lenses received a polish with One Step and a Dual Action machine polisher to bring out their clarity. We even hand-polished the original tool kit! Parts like the kidney grille, bonnet inserts, wing mirrors, and front light surrounds were all soaked in Dressle to revive the aging plastic, restoring its original lustre.
Inside, we stripped out the interior for a thorough deep clean. Using a steam cleaner with Verso all-purpose cleaner, we tackled every crevice. Verso was applied to all interior plastic surfaces and agitated with a detail brush to loosen grime. Nothing was overlooked—pedals, switches, door panels, and vents were meticulously cleaned, even with cotton buds for those hard-to-reach spots. After steam cleaning and vacuuming the entire cabin, Valet Nova added his signature matte finish. We then used Hide cleaner on the steering wheel to restore its condition.
To wrap up the day, the wheels were treated with Tripple polish to brighten the dishes and then sealed with Mint Rims wax for protection. We also used ObliTARate tar and glue remover on the tire sidewalls to remove any old dressing residue, ensuring that the new dressing would bond better and provide a smooth, even finish. The tire walls were finished off with Dressle for a natural, clean look.
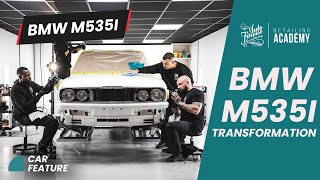
Day four was all about reassembling the E28. As you can see in the video, we stripped the car down as much as possible—without removing panels—so we could individually treat each component. Identity Wraps joined us to apply the livery you see now. We opted for a subtle look that still packs plenty of wow factor.
With the reassembly underway, we reinstalled the wheels and descaled the washer jets before refitting them. The side indicators, rear lights, kidney grilles, and original BMW badges were all put back in place, along with a new custom number plate, D20 WAX, that officially adds this beauty to the AF fleet. To wrap up the day, we hand-polished the paintwork and engine bay with Tripple car polish, bringing the final touches to a gleaming finish.
We wrapped up the project with a full photo shoot in London! This detail was incredibly rewarding; the E28 has transformed and now truly looks like part of the fleet with its meticulous detailing and fresh wrap. It was also fantastic to collaborate with some of the talented members of our Accredited Detailer Network on this journey.
A huge thank you to the talented members of our Accredited Detailer Network—Urban Valets, Valet Nova, Artisan Automotive, and The Car Genie—for their incredible work on this project.
